Thinking about how to give your face a little more definition, perhaps a bit of gentle shaping? Many folks look for ways to bring out their best features, and that often means adding some soft shadows and highlights. This process is about making certain parts of your face stand out or recede a little, giving a sense of structure. It is, in a way, like drawing an outline or creating a form, much like how a cartographer might draw a line on a map to show points of the same altitude, creating a visual sense of the land's shape. You are essentially working with light and shadow to redefine your face's natural curves and lines, giving it a more sculpted feel.
The right tools make all the difference when you are trying to achieve this kind of refined appearance. A good brush, specifically made for this purpose, helps you apply products smoothly and precisely, so your efforts look natural and blended. It is about getting that clear, yet soft, line that defines a cheekbone or a jawline without looking harsh or obvious. This kind of tool helps you place color exactly where it needs to go, which, you know, makes a big impact on the overall effect.
When you think about the word "contour," it really means an outline, especially of a curving figure, or the line that shows that outline. So, when we talk about a contour face brush, we are talking about a tool that helps you draw or create those very lines and shapes on your face. It is about bringing out the inherent beauty of your face's structure, making those features that you want to highlight truly shine, and allowing others to recede gently into the background, creating a more balanced and pleasing visual. This piece will explore how these special brushes help you achieve a polished look.
Table of Contents
- What Does a Contour Face Brush Do For Your Appearance?
- Getting Started With Your Contour Face Brush
- Picking the Best Contour Face Brush For Your Needs
- How Does a Contour Face Brush Help Create Shape?
- Keeping Your Contour Face Brush Clean and Ready
- Are There Different Kinds of Contour Face Brush?
- Tips For Using Your Contour Face Brush Effectively
- What Makes a Good Contour Face Brush?
What Does a Contour Face Brush Do For Your Appearance?
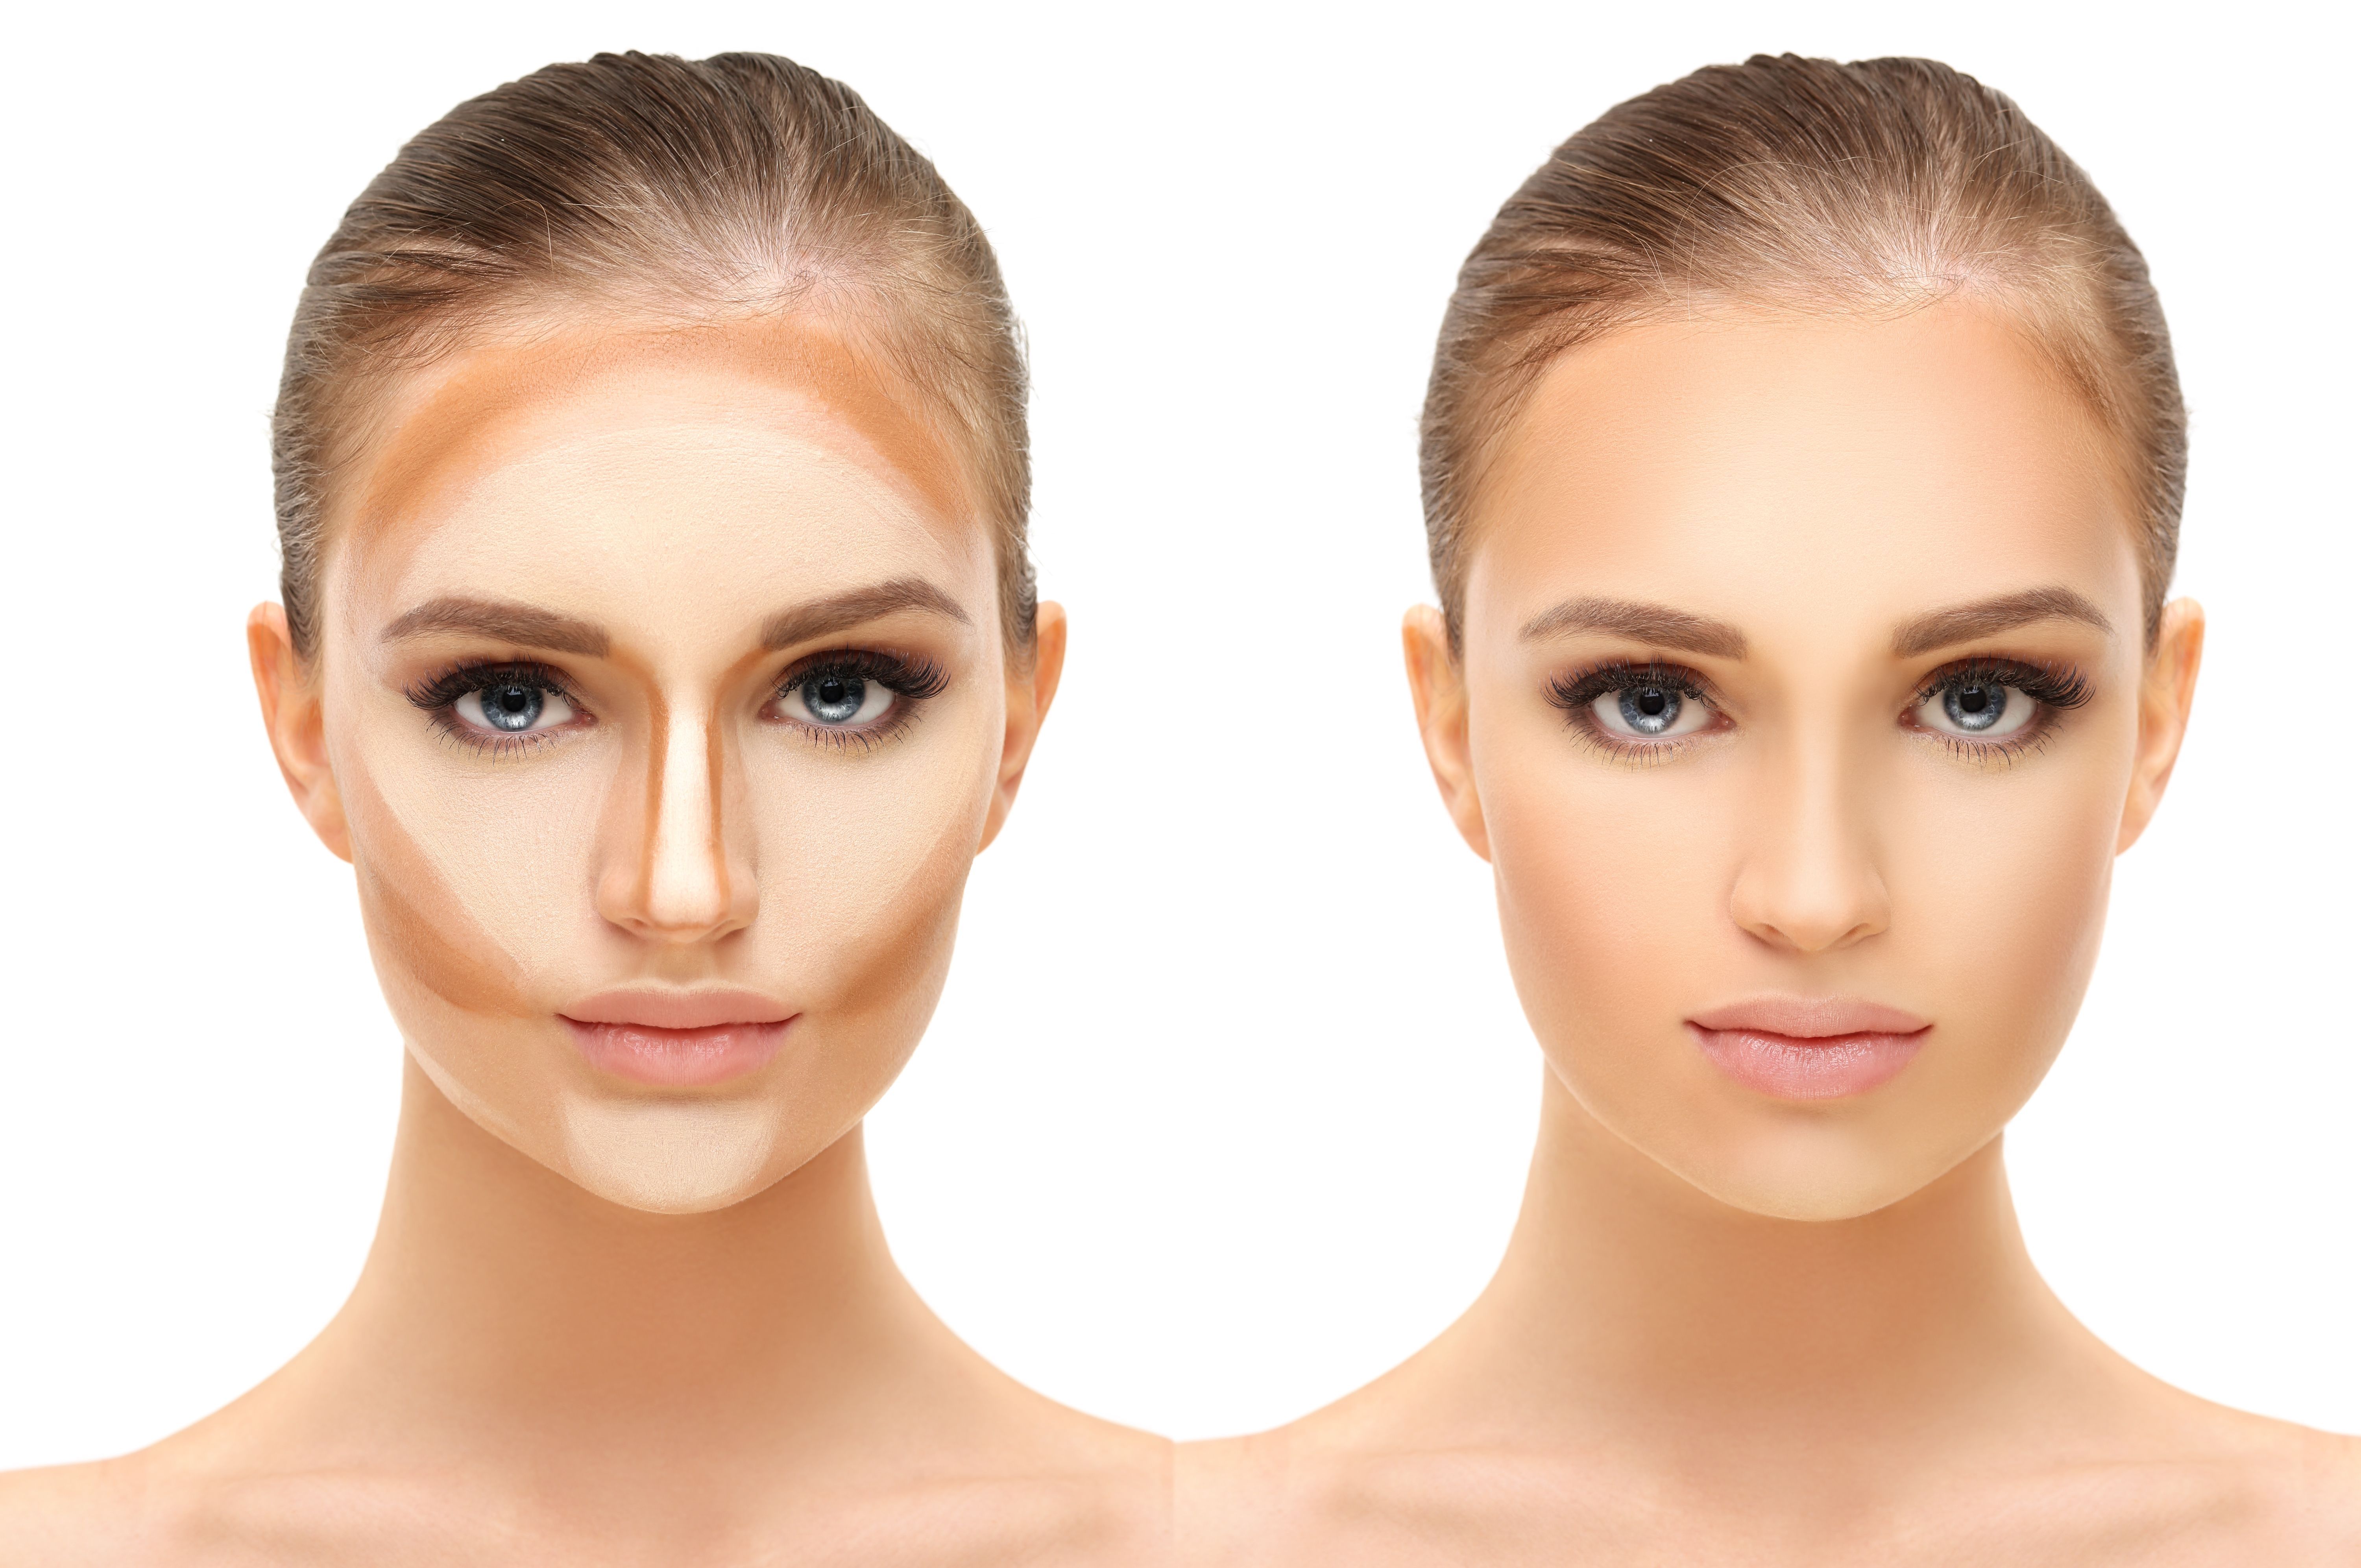
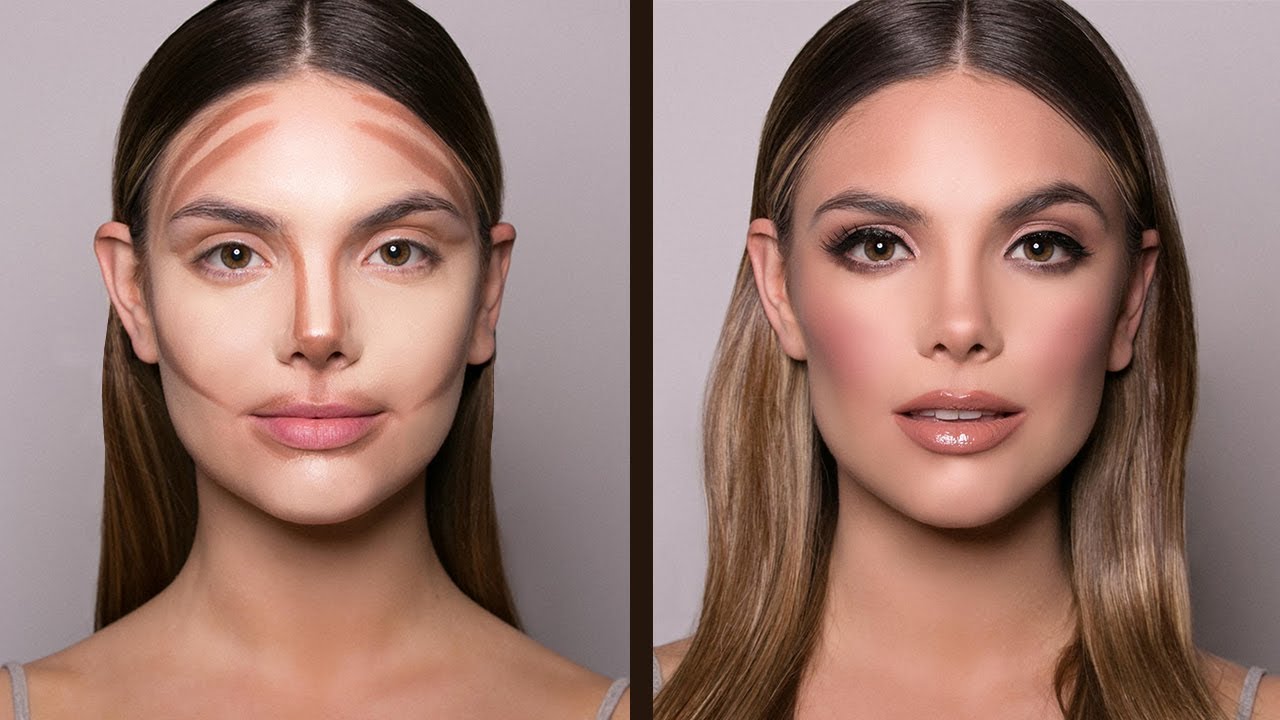
A contour face brush, at its core, helps you apply darker shades to areas you want to recede, like under your cheekbones or along your jawline. This action creates the illusion of shadows, which gives your face more depth and dimension. It is not about changing your face shape completely, but rather about bringing out the natural bone structure you already have. Think of it like how a sculptor works with clay, gently shaping and defining a figure. This brush helps you do that with makeup, making your features appear more defined and sculpted, so it's almost like a subtle art form for your face.
The way these brushes are shaped is really important. They are often angled or tapered, which lets you place the product in a very specific line or area. This precision is key because you want those shadows to look natural, not like a harsh stripe. A good brush helps you blend the product seamlessly into your skin, so there are no obvious lines where the contour begins or ends. It helps you get those results you can trust, where the effect is clear and easy to see, just like some tools give you clear readings.
Using a brush made for contouring also helps with product control. You pick up just the right amount of powder or cream, and you can build up the intensity slowly. This means you have more say over the final look, avoiding a situation where you apply too much at once. It gives you a lot of control over the definition of the line, which is, you know, pretty helpful for a polished finish. This thoughtful application makes a big difference in how your face looks overall, giving it that refined outline.
Getting Started With Your Contour Face Brush
When you first pick up a contour face brush, it might seem a little intimidating, but it is actually quite straightforward. The main idea is to find the natural hollows of your face. For most people, this means feeling right under your cheekbones. You want to apply your contour product, which should be a shade or two darker than your natural skin tone, right into these areas. The brush helps you lay down that color with a light hand, which is important for a natural look.
Start with a small amount of product on your brush. You can always add more if you need to, but taking away too much is harder. Gently tap off any extra powder before you bring the brush to your face. Then, using light, sweeping motions, apply the product along the line you want to create. For the cheekbones, this often means starting near your ear and moving down towards the corner of your mouth, stopping about halfway. This motion helps to define the shape.
Blending is the next big step, and it is where your contour face brush truly shines. After you have laid down the color, use the brush to softly buff and blend the product into your skin. You want to eliminate any harsh lines, making the shadow look like a natural part of your face's structure. This blending action is what makes the contour appear seamless and believable, so it's very much about softening the edges of that outline you are drawing. It is about making the definition look like it was always there.
Picking the Best Contour Face Brush For Your Needs
Choosing the right contour face brush can feel a bit like finding the perfect tool for a specific craft; there are many options out there, and each one has its own strengths. The best brush for you often depends on the type of contour product you prefer to use. If you like powders, a brush with softer, more flexible bristles might work well, as it helps to pick up and distribute the powder evenly. For cream or liquid contour products, a brush with denser, stiffer bristles can be more effective at blending the product into your skin without absorbing too much of it.
The shape of the brush head also plays a big part. Some brushes are angled, which is great for fitting right into the hollows of your cheeks and along the jawline. Others might be more tapered or rounded, offering a softer application that is good for more diffused shadows or for areas like the temples. Some people prefer a flat-top brush for a more precise application of cream products. It is really about what feels most comfortable and effective in your hand, and what helps you create the line or shape you are aiming for.
Consider the size of the brush head too. A smaller, more precise brush might be good for detailed work, like contouring the nose or very specific areas of the face. A larger, fluffier brush might be better for broader areas, like the forehead or jawline, where you want a softer, more diffused shadow. So, in some respects, the ideal brush is one that feels balanced and allows you to control where the color goes, helping you to define the outline of your features with ease. It is about matching the tool to the task, like choosing the right pen for a particular drawing.
How Does a Contour Face Brush Help Create Shape?
The way a contour face brush helps create shape comes down to its ability to place product precisely and then blend it out softly. When you think about the meaning of "contour" as an outline or the shape of a mass, this brush essentially helps you draw those outlines and define those masses on your face. By applying a darker shade to certain areas, you make those areas appear to recede, creating the illusion of shadow and depth. This visual trick makes other areas, like your cheekbones, seem to stand out more.
The bristles of the brush are designed to pick up just the right amount of product and then deposit it in a controlled manner. For example, an angled contour brush fits perfectly under the cheekbone, allowing you to draw a very specific line of shadow. Without a brush like this, it would be much harder to get that clean, defined line that then blends out so naturally. It is about precision in placement and then seamless diffusion, which, you know, makes all the difference in the final look.
Furthermore, the blending action of the contour face brush is what truly transforms a stripe of color into a believable shadow. The soft, sweeping motions with the brush blur the edges of the applied product, making it look like a natural part of your face's bone structure rather than makeup. This blending is key to creating a subtle, sculpted effect that looks natural and not overly done. It helps the outline you are creating appear soft and integrated, just like a well-drawn figure has smooth, flowing lines.
Keeping Your Contour Face Brush Clean and Ready
Keeping your contour face brush clean is pretty important for a few reasons. First off, a clean brush works better. When bristles get loaded with old makeup, oils, and skin cells, they cannot pick up new product as effectively, and they certainly cannot blend as smoothly. This means your contour might look streaky or uneven, which is not what anyone wants. A clean brush ensures that every application is fresh and precise, allowing you to create those clear lines and shapes without any issues.
Beyond performance, cleanliness is also about hygiene. Brushes that are not cleaned regularly can become breeding grounds for bacteria. Using a dirty brush on your face can lead to skin irritation, breakouts, or other skin concerns. It is a simple step that helps keep your skin healthy and happy. So, cleaning your contour face brush regularly is a good habit to get into, making sure it is ready to use right out of the box, in a way, for every application.
To clean your brush, you typically use a gentle soap or a dedicated brush cleanser and lukewarm water. Swirl the bristles in the palm of your hand or on a textured cleaning mat until the water runs clear. Then, reshape the bristles and lay the brush flat or hang it upside down to dry completely. This simple routine ensures your contour face brush remains an effective tool for defining the lines and forms of your face, giving you reliable results every time you reach for it.
Are There Different Kinds of Contour Face Brush?
Yes, there are quite a few different kinds of contour face brush, each with a slightly different purpose or preferred application method. It is not just one shape fits all. Some brushes are quite small and precise, with a very tapered or pointed tip. These are great for very specific contouring, like along the sides of the nose or for creating a very sharp line under the cheekbone. They allow for a lot of control over where the product goes, so you can really define those fine lines.
Then you have the more common angled contour brushes. These are probably what most people picture when they think of a contour face brush. Their angled shape fits beautifully into the hollows of the cheeks and along the jawline, making it easy to sweep product along these natural curves. They are good for both applying the product and then blending it out, which is pretty convenient. They help you create that curving or irregular figure on your face, giving it shape.
You might also find flat-top brushes, which are very dense and have a flat surface. These are often preferred for applying cream or liquid contour products because they can really buff the product into the skin for a seamless finish. Some people even use very fluffy, dome-shaped brushes for a softer, more diffused contour, especially if they are looking for a very subtle effect. So, in short, the variety of contour face brush options means you can find the perfect tool for your personal style and the type of contour you want to achieve.
Tips For Using Your Contour Face Brush Effectively
To get the most out of your contour face brush, there are a few simple tips that can make a big difference in your results. One of the most important things is to start with a light hand. It is always easier to add more product than to take it away. So, pick up a little bit of your contour shade, tap off any excess, and apply it gently. This way, you build up the intensity gradually, which gives you more control over the final look, which is very helpful for creating that perfect outline.
Consider your face shape when you are applying contour. While the general areas (under cheekbones, jawline, temples) are common, the exact placement and intensity might vary slightly depending on your unique features. For example, if you have a rounder face, you might extend your cheekbone contour a bit further down to create more length. If your face is longer, you might focus more on horizontal lines to add width. The contour face brush helps you adapt your technique to your own face, making it look natural.
Blending is, without a doubt, the most crucial step. After you apply your contour, use your brush to blend the edges until there are no harsh lines visible. You want the shadow to look like a natural part of your face, not a stripe of makeup. Use circular motions or soft back-and-forth sweeps until the product is completely diffused. This step makes all the difference between a noticeable line and a beautifully sculpted appearance. It is about making the definition appear soft and natural, much like a well-drawn figure has subtle, blended shadows.
What Makes a Good Contour Face Brush?
What makes a contour face brush truly good often comes down to its bristles and its overall construction. The bristles should be soft enough to feel comfortable on your skin but firm enough to pick up and distribute product effectively. For powder products, softer, more flexible bristles often work best, allowing for a diffused application. For creams, denser, more resilient bristles are often better at blending without soaking up too much product. The quality of the bristles also affects how well they hold their shape over time, which is pretty important for consistent results.
The shape and size of the brush head are also key indicators of a good contour face brush. An angled brush that fits snugly under your cheekbone, or a tapered one that allows for precise application on smaller areas, shows thoughtful design. The size should be appropriate for the areas you are contouring; a brush that is too large might apply product too broadly, while one that is too small might make blending difficult. It is about finding a brush that feels like an extension of your hand, allowing you to draw those lines and shapes with ease.
Finally, the handle of the brush matters too. A good handle should feel comfortable in your hand, offering a good grip and balance. This allows for better control during application and blending. A well-made contour face brush will feel sturdy and durable, suggesting it will last through many uses and washes. When all these elements come together, you get a tool that not only helps you define the outline of your features but also makes the whole process enjoyable and gives you results you can really trust.
This article has explored the concept of the contour face brush, looking at how it helps define and shape the face, much like an outline defines a figure. We discussed its purpose in creating depth and dimension, and how to get started using one. The piece also covered how to pick the right brush for your needs, considering different shapes and bristle types, and how the brush helps create those desired shapes through precise application and blending. We also touched upon the importance of keeping your contour face brush clean for both performance and hygiene, and looked at the various kinds of brushes available. Finally, we shared tips for effective use and what qualities make for a good contour face brush, emphasizing the role of quality bristles, appropriate shape, and comfortable design in achieving a polished, sculpted look.
- Bond No 9 Karol G
- George And Gina Lucy Handbags
- Nala Name Meaning
- Joaquín Bondoni
- Justine Love Island