Seeing those little runs and drips appear on your freshly spray-painted project can feel a bit like a tiny disaster, can't it? It's a common thing, really, to have paint go where you didn't quite mean for it to go. You've put in the effort, you've chosen your color, and then suddenly, there they are – those tell-tale streaks that just seem to spoil the smooth finish you were hoping for. It's frustrating, I mean, you want your work to look good, right? Well, getting things back on track, making them right again, is more straightforward than you might think.
When paint starts to gather and flow downwards, it often means there's a bit too much in one spot, or maybe the conditions weren't quite perfect. It's like when you're trying to set something just so, and it slips a little. The good news, though, is that most of these little mishaps can be sorted out. You can, in fact, deal with these situations and get your item looking the way you envisioned. It's about putting things back into good working order, you know, making it whole or able to work properly again. So, we'll talk about how to tackle those pesky runs and get your project looking smooth.
This guide is here to help you get a handle on those spray paint drips, showing you ways to correct them and even how to keep them from happening in the first place. It's about finding a way to make things firm and stable, to make sure your paint job stays put exactly where you want it. We'll go over what causes them and, too it's almost, what you can do to put things right. We'll look at the tools and methods that help restore a smooth surface, dealing with the problem head-on.
- Adrienne Arts Center Miami
- Frankie Valli Sopranos
- Bath And Body Works Birch Run
- Center Security Training Nyc
- Vee Bistro
Table of Contents
- What Causes Drips from Spray Paint?
- Can You Fix Drips from Spray Paint That Are Still Wet?
- How to Fix Drips from Spray Paint When Dry
- What About Prevention to Avoid Spray Paint Drips?
What Causes Drips from Spray Paint?
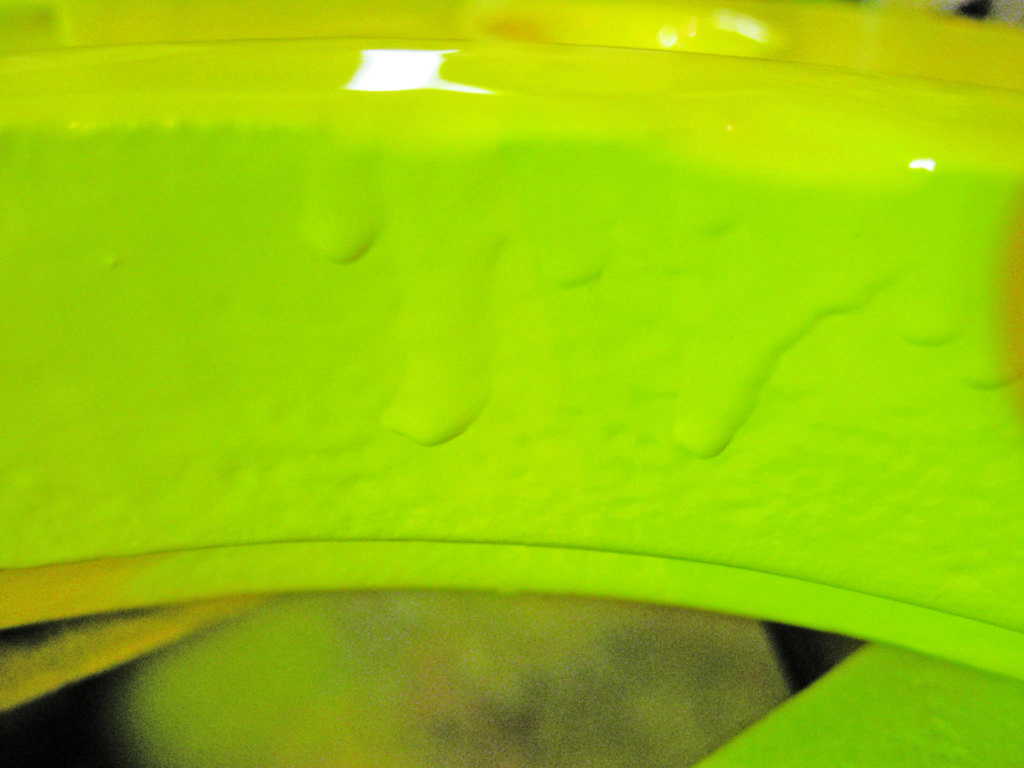
You might wonder why those drips show up in the first place, and it's a good question. It’s a bit like trying to balance too much on a small shelf; sooner or later, something’s going to fall. With spray paint, a common reason for drips is putting on too much paint all at once. If you hold the can too close to what you are painting, or if you move your hand too slowly across the surface, the paint builds up quickly. This extra paint has nowhere to go but down, creating those noticeable runs. It's just too much liquid in one spot, so it starts to travel.
Another thing that can cause these little paint slides is the temperature or the dampness in the air. If it's too cold, the paint might not settle and dry as fast as it should, allowing more time for it to sag. If it's very humid, that extra moisture in the air can also slow down the drying process, making the paint stay wet for longer. This gives gravity more time to pull the wet paint downwards. So, the environment where you're working really does play a part, you know, in how well the paint sets itself.
Sometimes, too, the surface you are painting might be a bit slick or not quite clean. If there's dust, grease, or even just some leftover polish on the item, the paint might not be able to grab on properly. It's like trying to get something to stick to a slippery surface; it just won't hold firm. When the paint can't get a good grip, it's more likely to slide around and form those drips. So, preparing the surface really does make a difference in how the paint settles and stays put, actually.
- Rhodes Pizza In Riverside Rhode Island
- After That
- Wodarczyk Interiors
- Benjamins Pharmacy
- Northwoods Falconry
Can You Fix Drips from Spray Paint That Are Still Wet?
When you spot a drip while the paint is still wet, it can feel a little urgent, like you need to act right away. And in some cases, you can try to make a quick adjustment. If it's just a tiny little bit of excess, and it hasn't started to really run, you might be able to gently wick away the extra paint with the edge of a piece of cardboard or a clean, soft cloth. The idea is to carefully lift the excess without smearing the surrounding area. It's a bit like trying to dab up a spill without spreading it further, you know?
However, and this is a big however, trying to mess with wet spray paint too much can sometimes make things worse. Spray paint dries very quickly, and if you start poking or wiping at it, you might end up with smudges, streaks, or even pull off the paint that was already setting. This could create a bigger mess than the original drip. So, you have to be very, very careful, and only try this if the drip is very minor and just formed, and you can be incredibly gentle. For anything more than a tiny, fresh run, it's often better to let it dry completely and then deal with it.
It's about knowing when to intervene and when to let things be. Sometimes, the best way to deal with a problem is to give it time to become a more stable situation. If you try to correct a wet drip and it ends up looking worse, you'll have more work to do later. So, while a quick, gentle dab might work for a very small, fresh drip, for most situations, letting the paint harden fully is the safer bet. This allows you to really get in there and make things right, so to speak, without creating new issues. It's more or less about making a good choice for the long run.
How to Fix Drips from Spray Paint When Dry
Once the paint has had a chance to fully dry and harden, you're in a much better position to make things right. Dealing with dry drips is a lot like fixing something that's been damaged; you can work on it without worrying about smearing fresh paint. The key here is to remove the raised part of the drip without harming the good paint around it. It's a process of careful adjustment, correcting the unevenness to get that smooth finish you want. We'll look at a couple of common ways to get this done, basically, to make the surface even again.
The Gentle Scrape to Fix Drips from Spray Paint
For drips that are pretty thick and stand out quite a bit, you can often start by gently scraping them away. You'll need something with a firm, flat edge, like a razor blade holder, a putty knife, or even the edge of a credit card. The trick here is to hold your scraping tool at a very low angle to the surface, almost flat, and then carefully push it across the top of the drip. You're trying to shave off just the raised part, not dig into the good paint underneath. It takes a steady hand and a light touch, you know, to make sure you're only removing what's extra.
This method works because the drip is often a raised mound of paint. By using a low angle, you're essentially slicing off the top layer of that mound. You might need to do this a few times, taking off a little bit at a time, rather than trying to get it all in one go. Think of it like carefully leveling something out. After you've scraped down the bulk of the drip, the area might still feel a little rough or look slightly uneven. That's totally fine, as this is just the first step in getting things back to normal. It's about getting the main part of the problem dealt with, as a matter of fact.
Always be careful when using sharp tools, of course. Make sure you're working in a well-lit area so you can clearly see what you're doing. The goal is to make the surface as flat as possible, preparing it for the next step. This initial scraping helps to make the overall repair process much easier, since you've already taken care of the most prominent part of the drip. It's like tackling the biggest part of a task first, so the rest feels more manageable. This way, you're setting yourself up for a better outcome.
Sanding Away the Spray Paint Drips
After you've scraped or for drips that aren't quite as thick, sanding is usually the next step to really smooth things out. You'll want to start with a medium-grit sandpaper, something like 220-grit, to get rid of any remaining bumps or roughness. Wrap the sandpaper around a small sanding block or a piece of wood to keep the pressure even. Then, gently rub the sandpaper over the dripped area, using small, circular motions. The idea is to slowly grind down the paint until the surface feels smooth and even with the surrounding paint. You're essentially making the repair invisible, you know?
Once you've made the drip mostly flat with the medium-grit paper, you'll want to switch to a finer grit, perhaps 320-grit or even 400-grit. This finer paper will help to remove any tiny scratches left by the coarser sandpaper and make the surface even smoother. Keep sanding until the area feels completely flat and looks uniform. It's a bit like polishing; you're refining the surface until it's just right. This careful sanding is what helps you restore the original look, making it whole again. It's pretty satisfying when it all comes together.
After sanding, wipe away all the dust with a clean, damp cloth. Let the area dry completely. At this point, you might see a dull spot where you sanded. This is normal. To make the repair disappear, you'll need to apply another light coat of spray paint over the sanded area, and possibly the entire piece, to blend everything in. Remember to spray in thin, even layers to avoid creating new drips! This final step is what really brings the piece back to its intended appearance, dealing with the problem completely. It's about putting the finishing touches on your work, basically.
What About Prevention to Avoid Spray Paint Drips?
The best way to deal with drips, honestly, is to keep them from happening in the first place. It's a bit like making sure a situation doesn't turn bad; if you take the right steps beforehand, you often won't need to fix anything later. Thinking about prevention means paying attention to a couple of key areas before you even start spraying. It's about setting things up so that the paint goes on smoothly and stays put, making things firm and stable from the very beginning. So, let's look at what you can do to avoid those annoying runs, you know, to make sure your project turns out just right.
Proper Surface Preparation to Fix Drips from Spray Paint
Getting your surface ready is a really big deal when it comes to spray painting. Think of it like getting a canvas ready for a painting; if the canvas isn't right, the art won't be either. Make sure the item you're painting is clean, dry, and free of any dust, grease, or loose bits. You can wash it with soap and water, then rinse it well and let it air dry completely. For smoother surfaces, like plastic or metal, a light sanding with fine-grit sandpaper can help the paint stick better. This gives the paint something to grab onto, which makes it less likely to slide and form drips. It's about setting a good foundation, in a way.
If there are any old, loose paint flakes or rust, you'll want to remove those too. Use a wire brush or sandpaper to get rid of anything that isn't firmly attached. After that, wipe the surface down again to remove any new dust. For some materials, using a primer can also make a huge difference. Primer creates a uniform surface for the spray paint to adhere to, which helps prevent uneven absorption and, you guessed it, drips. It's like giving the paint the best possible starting point, so it can do its job without issue. This step really helps to make sure the paint stays where it should, basically.
Taking the time to prepare your surface properly is an investment in a good outcome. It means the paint will go on more evenly, stick better, and dry without those unwanted runs. It's a simple step, but it makes a world of difference in how your finished project looks. You're setting yourself up for success, ensuring that the paint adheres well and stays firm. This little bit of effort beforehand can save you a lot of trouble later on, really, by making sure the paint behaves itself.
Mastering Your Spray Technique to Fix Drips from Spray Paint
Your spraying method is probably the most important thing for avoiding drips. It's all about control and consistency. First, always shake the spray can really well before you start, and even during your project, to make sure the paint is mixed properly. Then, hold the can about 8 to 12 inches away from the surface you're painting. If you get too close, you're putting too much paint in one spot too quickly, which is a common cause of drips. It's like pouring too much liquid into a glass too fast; it's going to overflow, you know?
When you spray, use steady, even strokes. Start spraying just before you reach the edge of your item and stop just after you pass the other edge. This way, you're not building up paint on the edges. Overlap each pass by about 50% to get good coverage without making it too thick. Keep the can moving; don't stop and start in the middle of the surface, as this can create puddles of paint. It's a continuous motion, almost like sweeping, to apply the paint evenly. This helps to make sure the paint sets properly and stays put, actually.
Apply several thin coats rather than one thick one. This is a golden rule for spray painting. It's better to do two or three light coats, letting each one dry to the touch before applying the next, than to try and cover everything in one heavy layer. Thin coats dry faster and are much less likely to drip. This also allows you to build up the color gradually and achieve a smoother finish. So, patience is key here. By taking your time and using these techniques, you'll find your projects look much better, without those pesky runs. It's about making sure the paint sets just right, basically, making the whole thing firm and stable.
This guide has walked through what causes those unwanted spray paint drips, whether you can make a quick adjustment while the paint is still wet, and how to go about fixing them once they've dried. We looked at gently scraping away thicker drips and then smoothing the area with sandpaper. We also talked about how important it is to prepare your surface well and how to use the right spraying technique to prevent drips from showing up in the first place. The aim is to help you get that smooth, even finish on your spray-painted projects, making them look just as you intended.